The promise of a delicious vegan dessert can sometimes end in disappointment. The lack of dairy and eggs can yield a dry and unsatisfying treat — but with the proper ingredient substitutions, vegan baked goods can be sensational. Such is the case with these desserts that you won’t be able to taste the difference. Whether you’re lactose intolerant, allergic to eggs, vegan or simply craving sugar, they’ll be sure to satisfy your sweet tooth.
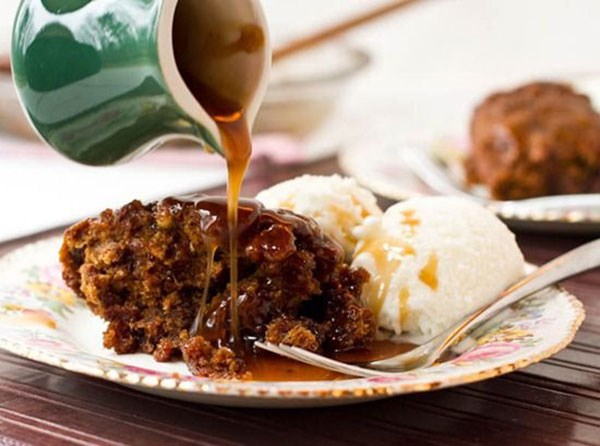
Sinless Sticky Toffee Pecan Pudding
This sticky pudding cake has the perfect amount of sweetness, remaining true to the original classic dessert, without going overboard. The cake is fantastic; once the sauce is poured on, it turns into a gooey, moist, and dense cake. The toasted pecans add a lovely texture to this dish and I don’t recommend skipping them unless necessary. Whatever you do…serve this dish WARM!
Inspired by Taste.com.au and Historical Foods.
Yield: 6-8 servings
For the cake:
- 200 grams pitted dates (about 1.5 cups), roughly chopped
- 1.5 cups almond milk
- 1/2 tsp baking soda
- 1/4 cup Earth Balance (or other vegan butter substitute), lightly softened
- 1/2 cup unpacked brown sugar (75 grams) OR 1/2 cup Sucanat
- 3/4 cup toasted chopped pecans, divided
- 1/2 tsp ground cinnamon
- 1/4 tsp kosher salt
- 1 & 1/4 cups whole wheat pastry flour (or all-purpose)
For the toffee sauce:
- 1/4 cup + 2 tbsp brown rice syrup*
- 1/4 cup + 2 tbsp unpacked brown sugar (35 grams) OR Sucanat
- 3 tbsp Earth Balance
- 1 tbsp vanilla extract
- 1 tbsp almond milk
- salt, to taste
1. Preheat oven to 325F and toast the pecans for about 8-10 mins. Now, preheat oven to 375F. Grease a 9-inch pie dish or an 8-inch square pan with Earth Balance. .
2. In a medium sized pot, bring 1.5 cups of almond milk to a low boil. Add in the chopped and pitted dates and reduce heat to low. Cook for 1 minute, remove from heat, and stir in baking soda. It will froth up a bit.
3. In a large bowl, whisk together the softened Earth Balance and brown sugar until no clumps remain. You can also use an electric mixer if desired. Now add in the date & almond milk mixture and stir.
4. Add the dry ingredients (cinnamon, salt, 1/2 cup of pecans, and whole wheat pastry flour) into the wet and stir until just combined. Spoon the mixture into the prepared dish.
5. Bake at 375F for 27-28 minutes, or until the cake gently springs back when you touch it.
6. Toffee sauce: About 10 mins before the cake is done, make your toffee sauce by whisking together the sauce ingredients in a pot (use the same one). Bring to a low simmer over medium heat, and then reduce heat to low, whisking frequently making sure it doesn’t burn. Heat for about 5 minutes while standing over the pot to stir & watch. Remove from heat and set aside.
7. Remove cake from oven, let it cool for a few minutes, and then prick with a fork or toothpick all over. I made about 100 holes. Pour 2/3 of the toffee sauce over the top of the cake (reserving the other 1/3 of the sauce for later) and smooth out with a spoon.
8. Scoop out your portions onto plates, drizzle with remaining sauce, and top with toasted pecans. Serve with a side of your favourite vegan ice cream (I love coconut bliss).
*Note: Other liquid sweeteners may work instead of brown rice syrup (you can use honey if you eat it), however the taste and consistency will change slightly. Maple syrup would also work, although it won’t get quite as thick.
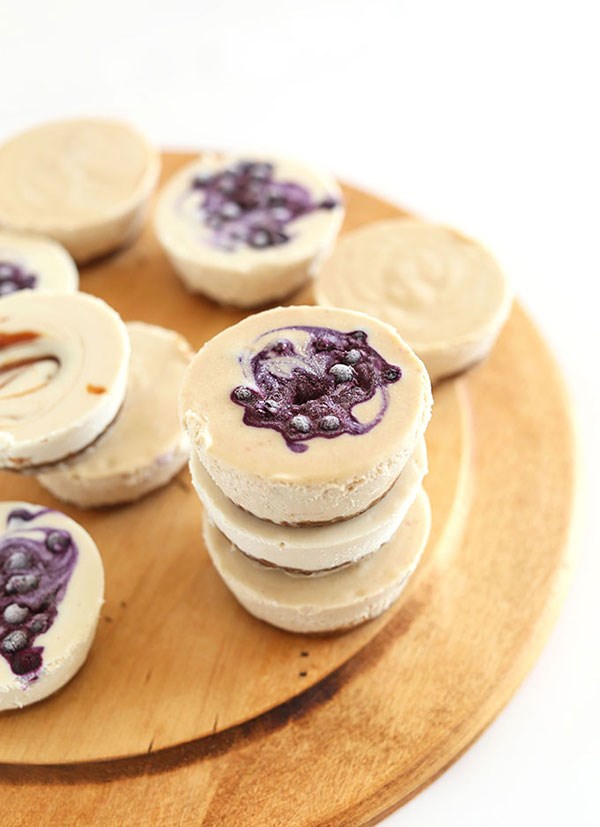
7 INGREDIENT VEGAN CHEESECAKES
- Crust:
- 1 cup pitted dates (soaked in warm water for 10 minutes then drained)
- 1 cup raw walnuts or almonds
- Filling:
- 1.5 cups raw cashews, soaked in water 4-6 hours then drained (NOTE: If short on time, pour boiling hot water over the cashews, soak for 1 hour, then drain and blend as instructed!)
- 1 large lemon, juiced (scant 1/4 cup)
- 1/3 cup coconut oil, melted
- 1/2 cup + 2 Tbsp full fat coconut milk (see instructions for note)
- 1/2 cup agave nectar or maple syrup (or honey if not vegan)
- Optional Flavor Add-Ins:
- 2 Tbsp salted natural peanut butter
- 1/4 cup wild blueberries (fresh or frozen)
- 3 Tbsp bourbon caramel sauce
- Add dates to a food processor and blend until small bits remain and it forms into a ball. Remove and set aside.
- Next add nuts and process into a meal. Then add dates back in and blend until a loose dough forms – it should stick together when you squeeze a bit between your fingers. If it’s too dry, add a few more dates through the spout while processing. If too wet, add more almond or walnut meal. Optional: add a pinch of salt to taste.
- Lightly grease a standard, 12 slot muffin tin. To make removing the cheesecakes easier, cut strips of parchment paper and lay them in the slots. This creates little tabs that makes removing them easier to pop out once frozen.
- Next scoop in heaping 1 Tbsp amounts of crust and press with fingers. To pack it down, use a small glass or the back of a spoon to compact it and really press it down. I found the bottom of a glass works well. If it sticks, separate the crust and the glass with a small piece of parchment. Set in freezer to firm up.
- Add all filling ingredients to a blender and mix until very smooth. For the coconut milk, I like to scoop the “cream” off the top because it provides a richer texture. But if yours is already all mixed together, just add it in as is.
- You don’t need a Vitamix for this recipe, just a quality blender. I mixed mine for 1 minute, then “liquified” or “pureed” it until silky smooth. If it won’t come together, add a touch more lemon juice or agave or a splash more coconut milk liquid as the liquid should help it blend better.
- Taste and adjust seasonings as needed. If adding peanut butter, add to the blender and mix until thoroughly combined. If flavoring with blueberry or caramel, wait and swirl on top of plain cheesecakes (optional).
- Divide filling evenly among the muffin tins. Tap a few times to release any air bubbles, then cover with plastic wrap and freeze until hard – about 4-6 hours.
- Once set, remove by tugging on the tabs or loosening them with a butter knife. They should pop right out. Our favorite way to devour these was with a little more caramel and a touch of coconut whipped cream. But they’re perfect as is! Keep in the freezer for up to 1-2 weeks.
- Optional: you can set them out for 10 minutes before serving to soften, but I liked them frozen as well.
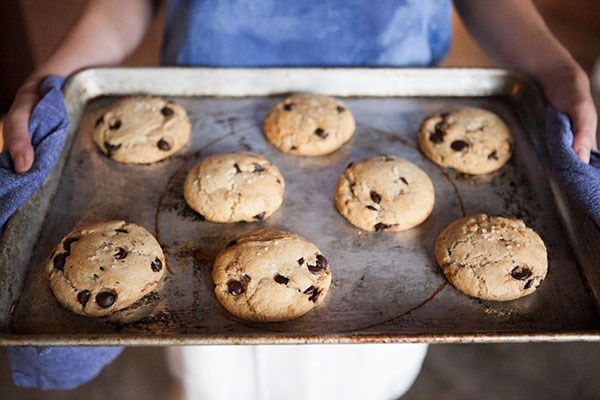
Salted Chocolate Chip Cookies (Vegan)
Yield: Approximately 18 cookies
2 cups all-purpose flour
1 tsp. baking powder
3/4 tsp. baking soda
1/2 tsp. salt
1 ¼ cup dark chocolate chips (we prefer chocolate with 60 percent cocoa content or higher)
1/2 cup sugar
1/2 cup (packed) light brown sugar
1/2 cup + 1 tablespoon canola oil
1/4 cup + 1 tablespoon water
Coarse-grained sea salt or flaky sea salt like Maldon, for garnish
In a large bowl, whisk together flour, baking powder, baking soda, and salt. Add the chocolate chips to the flour mixture and toss to coat.
In a separate large bowl, whisk the sugars briskly with the canola oil and water until smooth and incorporated, about 2 minutes. Note: use fresh, soft light brown sugar. If there are clumps, break them up with the back of a spoon or your hand before whisking.
Add the flour mixture to the sugar mixture, and then stir with a wooden spoon or a rubber spatula until just combined and no flour is visible. Do not overmix.
Cover with plastic wrap. Refrigerate the dough for at least 12 hours and up to 24 hours. Do not skip this step.
Preheat the oven to 350°. Line a rimmed sheet pan with parchment paper.
Remove dough from the refrigerator and use an ice cream scoop or a spoon to portion dough into 2-inch mounds. We recommend freezing the balls of dough for 10 minutes before baking as the cookies will retain their shape better while baking.
Sprinkle the balls of dough with coarse-grained sea salt (if freezing, remove balls of dough from the freezer first), and bake for 12 to 13 minutes, or until the edges are just golden. Do not overbake.
Let cool completely before serving.
Excerpted from Ovenly by Agatha Kulaga and Erin Patinkin (Harlequin). Copyright © 2014. Photographs by Winona Barton-Ballentine .
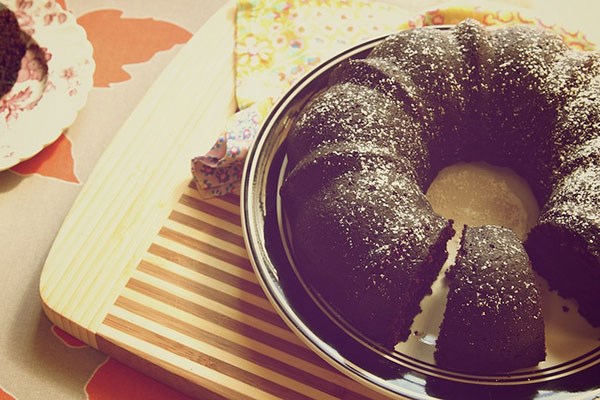
Simple Vegan Chocolate Cake
makes 1 9-inch chocolate bundt cake
2 1/4 cup all-purpose flour
1/2 cup dutch processed cocoa powder
1 1/2 cups granulated sugar
1 teaspoon baking soda
1/4 teaspoon baking powder
1/2 teaspoon salt
1 cup warm coffee
1/2 cup plus 1 tablespoon vegetable oil
2 teaspoons pure vanilla extract
small handful of chocolate chunks and/or cocoa nibs (optional)
Place rack in the center of the oven and preheat oven to 350 degrees F. Grease a 9-inch bundt pan with vegetable shortening and dust with cocoa powder. Set aside.
In a large bowl, whisk together flour, cocoa powder, sugar, baking soda, baking powder, and salt. In a medium bowl, whisk together coffee, oil, and vanilla.
Add the wet ingredients, all at once to the dry ingredients and whisk until just combined. Stir in chocolate chunks and cocoa nibs, if using.
Pour the batter into the prepared pan. The batter will be relatively thick. Bake for 30-35 minutes, or until a cake tester inserted into the center of the cake comes out clean.
Remove from the oven and allow to cool in the pan for 10 minutes before inverting onto a wire rack to cool completely. Sprinkle with powdered sugar and serve.
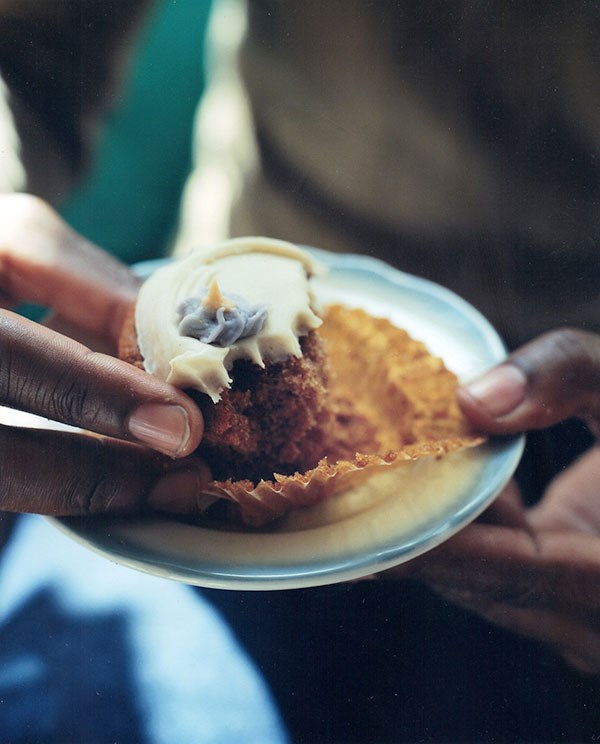
BabyCakes NYC’s Gluten Free Vegan Carrot Cupcakes
- To make the Vanilla Frosting:
- 1 1/2 cups unsweetened soy milk
- 3/4 cup dry soy milk powder
- 1 Tbsp coconut flour
- 1/4 cup agave nectar
- 1 Tbsp pure vanilla extract
- 1 1/2 cups coconut oil
- 2 Tbsp fresh lemon juice
- In your Vitamix or Sous Chef® Food Processor combine the soy milk, soy powder, coconut flour, agave nectar, and vanilla.
- Blend the ingredients for 2 minutes.
- With the machine running, slowly add the oil and lemon juice, alternating between the two until both are fully incorporated.
- Pour the mixture into an airtight container and refrigerate for 6 hours of for up to 1 month.
- If you are using this mixture as a sauce, store the mixture at room temperature for up to 1 week.
- To make the Cupcakes:
- 3 cups Bob’s Red Mill Gluten-Free All-Purpose Baking Flour
- 1 Tbsp baking powder
- 1 Tbsp baking soda
- 1 tsp xanthan gum
- 1 1/2 tsp salt
- 1 Tbsp ground cinnamon
- 2 tsp ground ginger
- 1/2 tsp ground nutmeg
- 2/3 cup coconut oil
- 1 cup agave nectar
- 1 cup rice milk
- 1 Tbsp pure vanilla extract
- 1/2 cup hot water
- 3 cups shredded carrots
- Preheat the oven to 325 F.
- Line 2 standard 12-cup muffin tins with paper liners.
- In your Sous Chef® Food Processor, mix together the flour, baking powder, baking soda, xanthan gum, salt, cinnamon, ginger, and nutmeg.
- Add in the oil, agave nectar, rice milk, and vanilla to the dry ingredients just until a thick batter forms.
- Slowly add the hot water and continue mixing until the batter is smooth.
- Using a plastic spatula, gently fold in the carrots just until they are evenly distributed throughout the batter.
- Pour 1/3 cup batter into each prepared cup, almost filling it.
- Bake the cupcakes on the centre rack for 25 minutes, rotating the tins 180 degrees after 14 minutes. The finished cupcakes will bounce back slightly when pressed, and a toothpick inserted in the centre will come out clean.
- Let the cupcakes stand in the tins for 20 minutes, then transfer them to a wire rack and cool completely.
- Using a frosting knife, gently spread 1 tablespoon of vanilla frosting over each cupcake.
- Store the cupcakes in an airtight container in the refrigerator for up to 3 days.
Reprinted with permission from Babycakes by Erin McKenna, copyright © 2009. Published by Clarkson Potter/Publishers, an imprint of the Crown Publishing Group, a division of Random House, Inc., New York.
Photo by Tara Donne © 2009
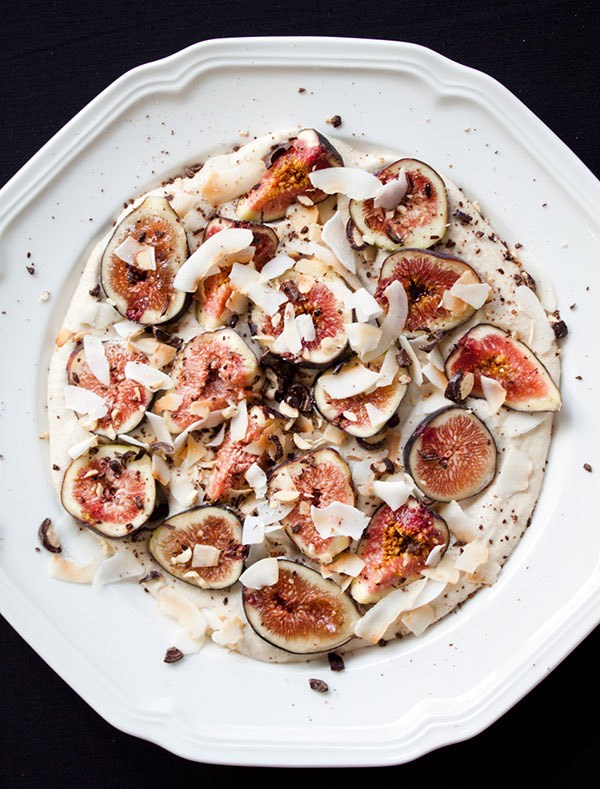 Figs & Cashew Cream
serves 4-6 for dessert
10 ripe figs, cut in half
1 1/2 cup raw, unsalted cashews
1 scant cup of water
1/4 teaspoon salt
1/3 cup honey or agave syrup
1 heaping tablespoon coconut oil
1/2 cup large coconut shreds
dark chocolate bar, shaved (optional)
Cover cashews in water and soak for 6 hours or overnight. When ready to make dessert, strain the soaked cashews. In a blender place cashews, scant one cup water, vanilla, salt, agave and coconut oil into the vessel. Blend for about 2 minutes at high speed, until completely smooth. Taste and add more sweetness or salt, if desired. Set aside.
Meanwhile, slice figs and toast coconut shreds in a medium, un-greased pan for about 4 minutes, until coconut is slightly brown and fragrant. Shave a chocolate bar or cut chocolate into very small pieces to garnish dish.
When serving, spread cashew cream onto base of a pretty platter, arrange fruit on top of cashew cream and finish with toasted coconut and chocolate. Serve chilled or room temperature.
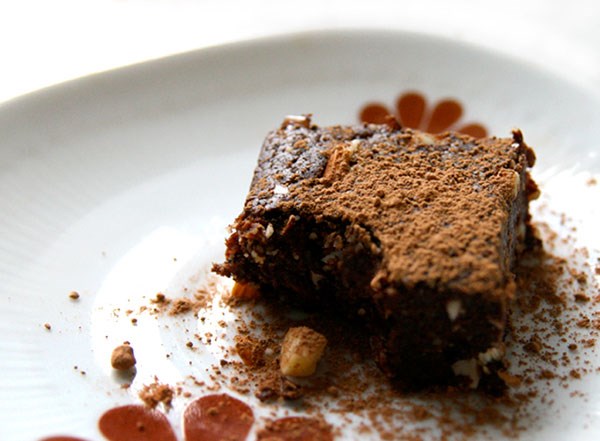
The Raw Brownie
Ingredients:
2 cups whole walnuts
2 ½ cups Medjool dates, pitted
1 cup raw cacao
1 cup raw unsalted almonds, roughly chopped
¼ tsp. sea salt
Directions:
1. Place walnuts in food processor and blend on high until the nuts are finely ground.
2. Add the cacao and salt. Pulse to combine.
3. Add the dates one at a time through the feed tube of the food processor while it is running. What you should end up with is a mix that appears rather like cake crumbs, but that when pressed, will easily stick together (if the mixture does not hold together well, add more dates).
4. In a large bowl (or the pan you plan on putting the brownies in), combine the walnut-cacao mix with the chopped almonds. Press into a lined cake pan or mold. Place in freezer or fridge until ready to serve (it is also easier to cut these when they are very cold). Store in an airtight container.
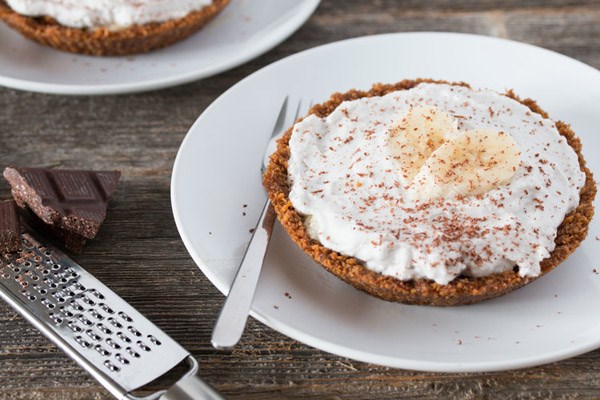
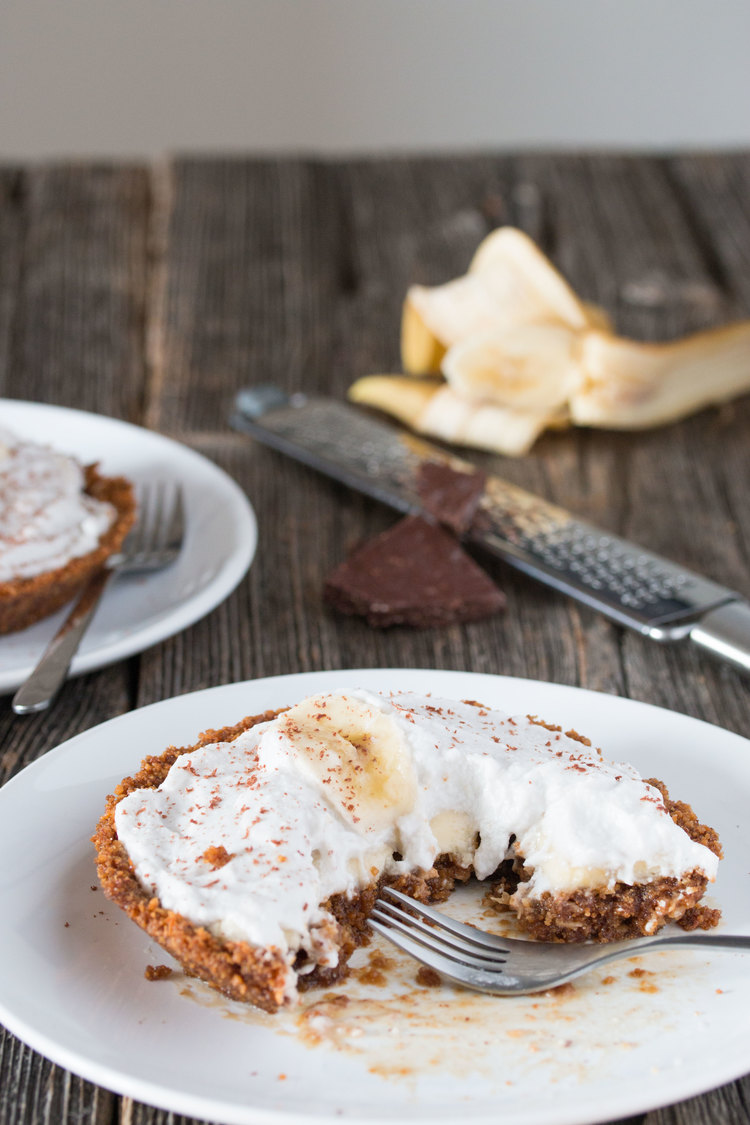
ingredients (makes 2 x 6″ pies):
10 vegan graham crackers
2 tbsp shredded coconut
1/4 C brown sugar
1/4 C melted vegan butter
2 bananas
1 can coconut cream (refrigerated overnight)
If you’ve seen our coconut whip recipe then you know that you should always have a can of coconut cream in the fridge on stand by just waiting to be turned into dessert topping! We like blue monkey organic coconut cream so before you even get into this recipe make sure you’ve refrigerated a can overnight or for at least 8 hours so it’s really solid and cold.
Before you begin this recipe place the beaters of your mixer and a stainless steel or glass mixing bowl in the freezer!
Crush up graham crackers either in a food processor or place the whole graham crackers in a ziploc bag and roll over them a few times with a rolling pin or glass bottle. They should be crushed into a very fine crumb. Then combine the crumbs with the shredded coconut, brown sugar, and melted vegan butter using your fingers or a fork. Press this mixture evenly into the bottom and sides of your pie pans.
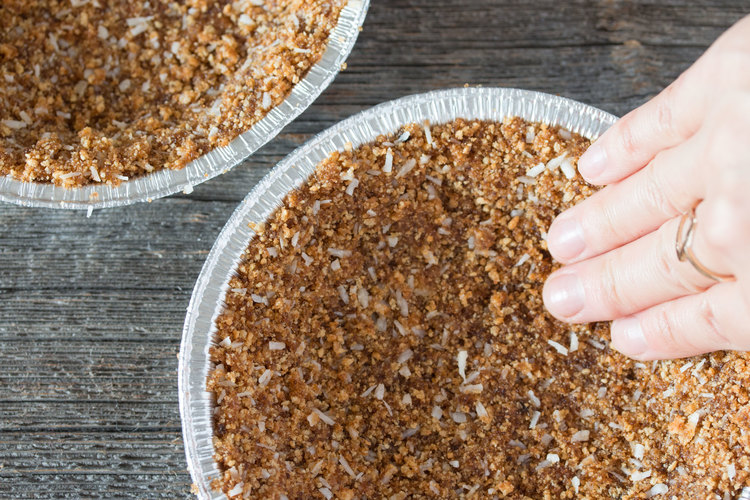
Bake at 350 F for 10 mins. Watch closely so they don’t burn. Allow the crusts to cool completely before adding the filling.
When opening your can of coconut cream scoop out all the solid cream from the top. Don’t use any of the liquid at the bottom. Refrigerate it and use it in another recipe. Whip up coconut cream in the cold mixing bowl with a hand mixer on high for a few minutes until smooth and fluffy. Place sliced bananas into the bottom of the baked crusts and top with coconut cream. Garnish with more banana slices, grated chocolate, or a sprinkle of cinnamon if you wish.
You can serve the pies immediately or chill them in the fridge.
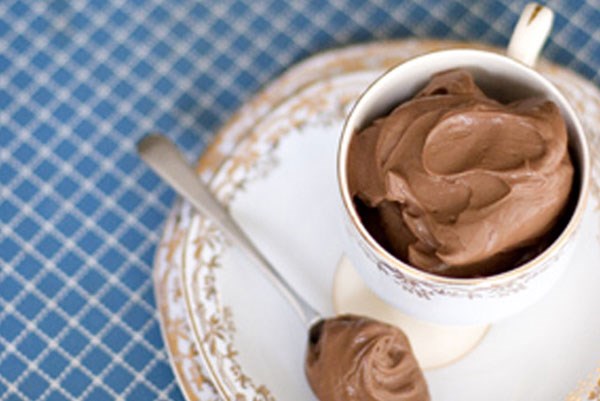
Amaretto-Spiked Vegan Chocolate Mousse Recipe
1/2 cup organic chocolate soy milk (for this recipe I like to use Vitasoy Rich Chocolate Soy Milk)
9 or 10 ounce bag of semisweet vegan chocolate chips (I’ve had good success with Tropical Source or Sunspire Brand all-natural brands, NOT carob chips)
12 ounces silken tofu
1/4 cup Amaretto or almond-flavored liquor
1/4 teaspoon natural pure almond extract (I use the Flavorganics Almond Extract for this recipe)
Pour the chocolate milk into a small pot and bring to a simmer. Remove the milk from heat and let cool a bit while you melt down the chocolate chips. You can melt the chocolate chips in a double boiler or if you are like me, and don’t own a double-boiler, you can cobble one together using a tiny saucepan set under a larger mixing bowl. Fill the tiny saucepan with an inch or two of water and bring barely to a simmer – place the big mixing bowl with the chocolate chips on top of the tiny saucepan and let the heat come up and gently warm the chips while you stir occasionally until completely melted. Remove from heat.
Add the soy milk and silken tofu to the melted chocolate chips. Process with a hand or regular blender until completely smooth. Stir in the Amaretto and almond extract. Taste and adjust for flavor, adding a bit more extract if needed.
Chill in the big bowl (or in individual bowls) for at least 1 1/2 hours, the longer the better. The pudding will set up nicely as it cools.
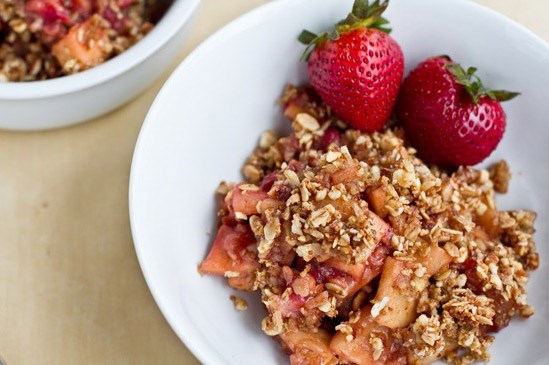
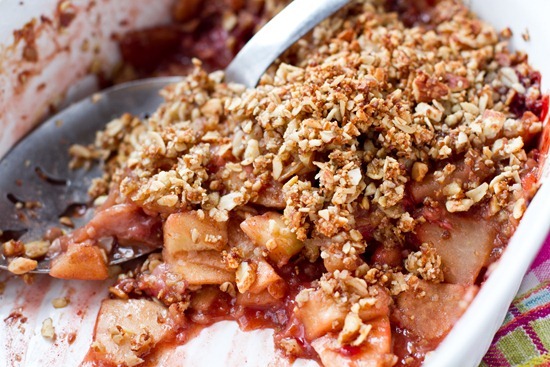
Strawberry Apple Breakfast Crisp
This isn’t your grandma’s apple crisp! It is flourless, all-natural, reduced in sugar, and vegan. I love the chewy topping thanks to the processed almond mixture. If you are looking for a traditional crisp recipe, this probably isn’t the one for you, but we enjoyed it nonetheless. It could also be made gluten-free quite easy by using gluten-free oats.
Adapted from Kalyn’s Kitchen and Sprinkled with Flour.
Yield: 6 servings
Filling:
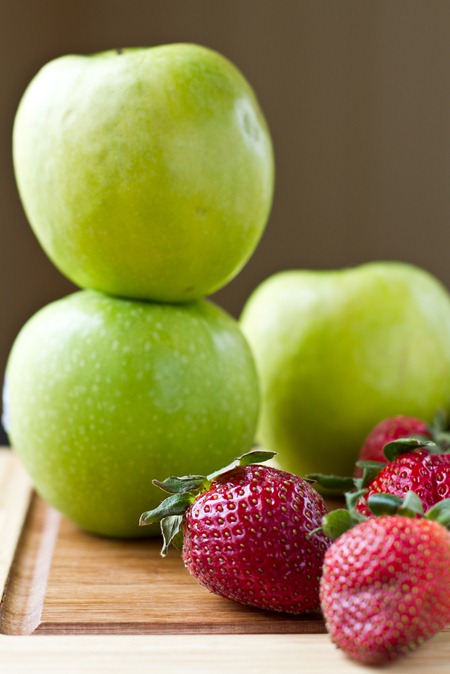
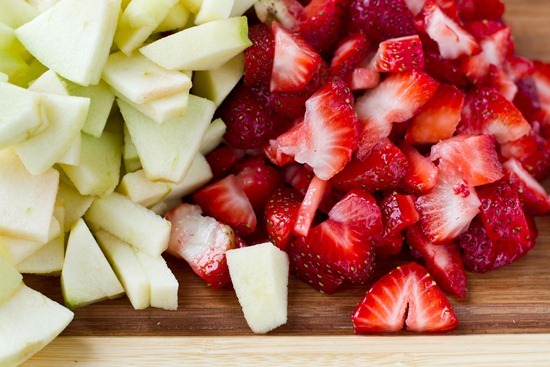
- 3 lg. Granny Smith apples, peeled and chopped
- 2 cups sliced fresh strawberries
- 1/4 cup Sucanat (or regular sugar)
- 1/2 tsp ground cinnamon
- 1/4 tsp kosher salt
- 1 tbsp lemon juice
- 1 tbsp + 1 tsp arrowroot powder (or cornstarch)
- 1 tsp vanilla extract
Topping:
- 1 cup almonds, processed until chunky
- 1/2 cup regular rolled oats
- 1/4 cup Sucanat (or regular sugar)
- 1 tbsp pure maple syrup
- 2 tbsp extra virgin olive oil
- Pinch kosher salt
- 1/2 tsp vanilla extract
Directions:
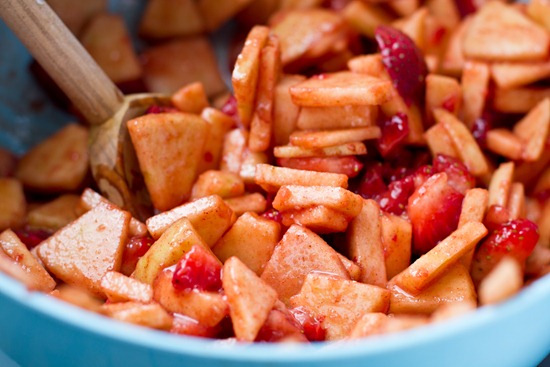
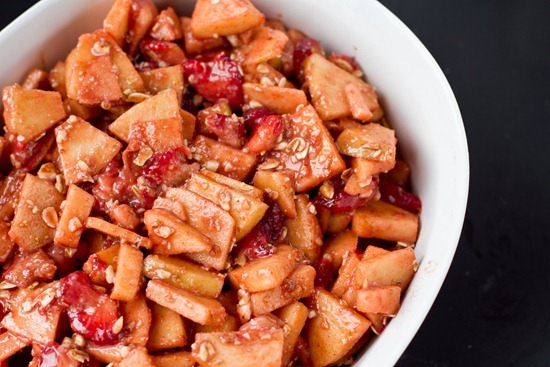
1. Preheat oven to 400F and grease a 1.4 L casserole dish. Peel and chop the apples and slice the strawberries. Place in a large bowl and mix with the rest of the filling ingredients. Stir well and set aside.
2. In a food processor, place 1 cup almonds into the bowl and process until chunky (see pic below). Add the rest of the ingredients and pulse for a few seconds until just mixed. You don’t want to over-process this mixture so that it stays chunky. Pour 1/2 cup of this topping into the apple mixture and stir.
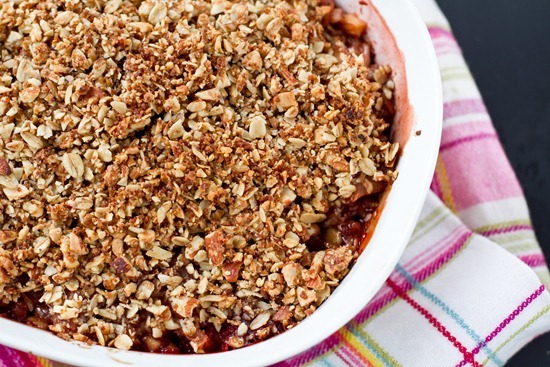
3. Pour the apple filling mixture into the prepared casserole dish and sprinkle on all the remaining topping over top.
4. Cover (with casserole lid or foil poked with holes) and bake for about 40 minutes at 400F. If you do not cover it, the topping will burn. Allow to cool for about 15 minutes before serving. Be careful because it will be super hot!
[/print_this]
Chop, chop!
I timed the prep time for this recipe and it was about 25 minutes. Probably less if you aren’t taking pictures. 😉
Mix all the filling ingredients into a large bowl and set aside.
Now lightly process 1 cup almonds, until it looks like this:
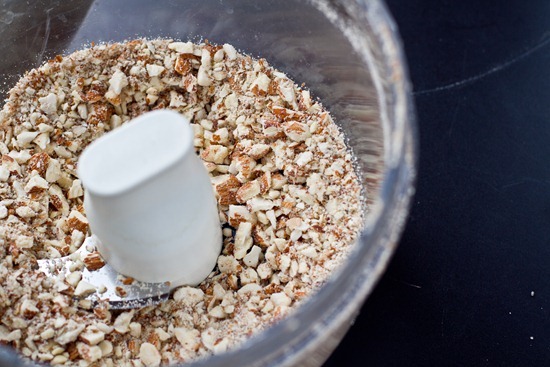
Pulse in the rest of the topping ingredients: oats, olive oil, vanilla, Sucanat (or sugar), pure maple syrup, and a pinch of salt.

It will look very crumbly like this:

Take 1/2 cup of the topping and stir it into the apple filling. Pour into your prepared casserole dish.
Sprinkle on the topping and bake COVERED at 400F for 40 minutes. If you do not cover it the topping will burn.
Voila! A healthier apple crisp that you can enjoy for breakfast.
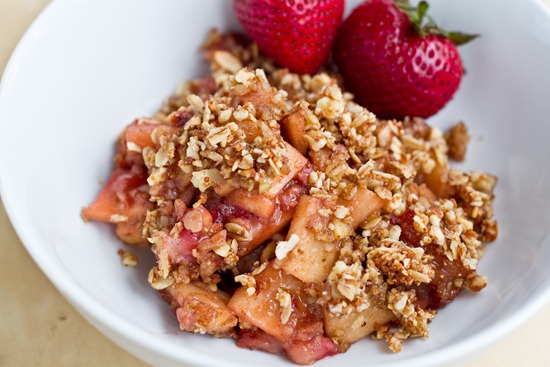
This crisp is by no means a traditional apple crisp in taste or texture, but we still enjoyed it. The almond topping is very chewy and provides healthy fats, protein, fibre, copper, calcium, magnesium, and B2. I liked that it wasn’t very sugary and could be enjoyed for breakfast without weighing me down.